
Embarking on an exhilarating gaming session, only to find your trusty controller’s rubber pad acting up, can be a frustrating experience. Whether it’s wear and tear from countless battles or an accidental mishap, addressing this issue promptly is crucial to ensure your gaming adventures remain seamless. In this comprehensive guide, we will walk you through the step-by-step process of fixing a rubber pad in your gaming controller. Equip yourself with the knowledge and tools needed to revive your controller’s responsiveness and get back to conquering virtual worlds without a glitch. Let’s dive into the world of DIY controller repair and rediscover the joy of uninterrupted gaming.
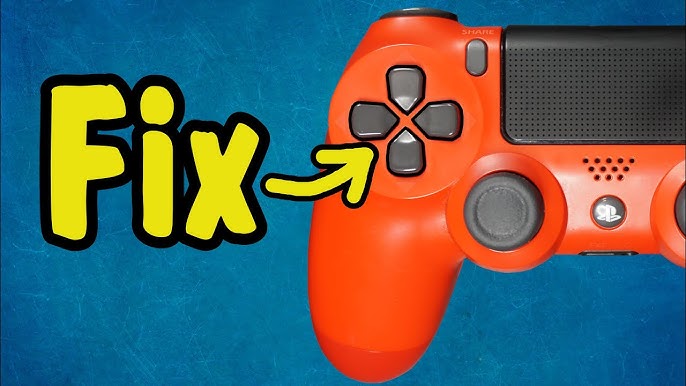
How to fix a rubber pad in a gaming controller
Before diving into the repair process, take a moment to understand the extent of the issue. Is the rubber pad simply worn out, or is there additional damage? This initial assessment will guide your approach to fixing the problem, Picture the worn-out rubber pad as a battle scar, a testament to the countless gaming victories and defeats. It’s a part of your controller’s journey, and now it’s time to give it a second life.
Gather Your Tools
Equip yourself with the right tools for the job. A set of screwdrivers, replacement rubber pads, and some cleaning supplies will be your companions on this repair journey.
Think of these tools as your gaming toolkit, each piece serving a unique purpose in the quest to revive your controller. It’s like gearing up for a gaming expedition.
Best budget gaming monitor for laptop
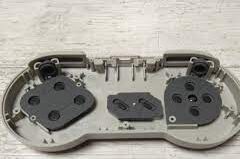
Disassemble with Care
Safety first! Begin by carefully disassembling your controller, following any manufacturer guidelines. This step requires patience and precision to avoid any unintended mishaps.
Imagine it as unraveling the mysteries of your controller’s inner workings, like uncovering the hidden secrets of a game level. Take your time, and enjoy the process.
Examine and Clean
Once you have access to the rubber pad, closely examine it for any visible damage. If it’s just wear and tear, rejoice! Give it a thorough cleaning to remove any accumulated grime or residue.
Consider this cleaning as a refreshing spa day for your controller. A chance for it to rejuvenate and come back to life, ready for more adventures.
Repair or Replace
Depending on the severity of the rubber pad’s condition, decide whether a repair will suffice or if it’s time for a replacement. DIY repair options can work wonders, but if needed, swap it out with a new pad.
Think of this step as choosing the perfect upgrade for your in-game character. It’s about enhancing performance and ensuring your controller is at its prime.
Reassemble and Test
Carefully put your controller back together, ensuring each component finds its rightful place. Before fully assembling, give it a test run to make sure everything is working seamlessly.
This is the triumphant moment—the culmination of your efforts. It’s like putting on a suit of armor before heading into a grand gaming battle. Revel in the satisfaction of a job well done.
Enjoy Uninterrupted Gaming
With your controller revived, it’s time to dive back into your favorite games. Celebrate the success of your DIY repair and relish in the uninterrupted gaming experience.
Consider this final step as the hero returning to their quest, armed with a reinvigorated controller. The gaming world awaits your triumphant return!
Remember, this step-by-step guide is not just about fixing a rubber pad; it’s a narrative of your controller’s resilience and your commitment to ensuring it continues to be your gaming companion.
Tools and Materials: Your Arsenal for Controller Restoration
Before embarking on the journey to revive your gaming controller, gather the essential tools for the task. Here’s what you’ll need:
- Screwdriver Set: An assortment of screwdrivers to safely disassemble the controller.
- Replacement Rubber Pads: Ensure you have the right-sized replacement pads ready.
- Cleaning Supplies: A gentle cleaner and a soft cloth to eliminate any accumulated grime.
- Storytelling Tip: Think of these tools as your trusty companions on a quest. The screwdriver set is your map, the replacement pads your provisions, and the cleaning supplies your healing potions.
Prepare Your Workspace
Find a well-lit, spacious area to set up your makeshift repair station. Lay down a clean, soft surface, like a cloth or a padded mat, to prevent any accidental scratches or damage during the process.
Best budget gaming monitor for ps4 this year!
Envision this workspace as the command center for your gaming controller’s revival. It’s your dedicated workshop, where the magic of repair is set to unfold.
Safety First
Before you start, power off your gaming console and disconnect the controller. This ensures a safe environment for both you and your equipment during the repair process.
Consider this step as putting on your safety gear before embarking on an adventurous quest. It’s the responsible side of your gaming persona.
Patience and Precision
As you approach the disassembly phase, remember that patience and precision are your allies. Follow any manufacturer guidelines for opening the controller, ensuring you don’t force any components.
Think of disassembling the controller as delicately unlocking the secrets of a treasure chest. Slow and steady wins the day.
A Personal Connection
As you handle each component, recognize the personal connection you have with your controller. This is not just a piece of equipment; it’s been with you through countless gaming adventures.
Picture each part as a cherished companion, and handle it with the care and respect it deserves. It’s a reunion with an old friend.
Quality Replacement Pads
If your assessment reveals the need for replacement, carefully choose quality rubber pads. Opt for pads that match the specifications of your controller, ensuring a perfect fit.
Think of this step as choosing the perfect companion for your controller’s next chapter. It’s about finding the right partner for the next set of gaming exploits.
The Healing Touch of Cleaning
Before the reassembly begins, give your controller and its components a gentle yet thorough cleaning. This not only removes any dirt but adds a touch of rejuvenation to the entire process.
Envision the cleaning process as a refreshing spa day for your controller. It’s the equivalent of a soothing massage after a day of intense battles.
Now that your tools are ready and your workspace is set, you’re well-prepared to embark on the practical journey of fixing the rubber pad in your gaming controller. This isn’t just about repair; it’s about giving your trusted gaming companion the care it deserves.
Addressing Faulty Buttons
Begin your quest for a healthier controller by identifying the troublesome button. Pay attention to any inconsistencies in responsiveness or unusual behavior during your gaming sessions.
Consider this step as a detective’s investigation. The faulty button is like a puzzle piece out of place, and you’re about to restore order to the gaming kingdom.
Best Budget Gaming Monitor for Xbox Series S
Gather Your Tools
Equip yourself with the tools needed for this specific mission:
- Precision Screwdriver Set: Your trusty sidekick for safely navigating the controller’s inner workings.
- Compressed Air Can: To blow away any debris causing button dysfunction.
- Rubbing Alcohol and Cotton Swabs: Gentle cleaners to wipe away grime.
- Imagine these tools as the companions joining you on a noble quest. Each one has a specific role, contributing to the restoration of your controller’s vitality.
Disconnect and Power Down
Before delving into the repair, ensure the safety of both you and your console. Disconnect the controller and power down your gaming system.
Picture this as a respectful bow before engaging in battle. It’s a moment of acknowledgment for the journey your controller is about to undertake.
Gentle Disassembly
Using your precision screwdriver set, carefully disassemble the controller. Exercise caution to avoid any undue stress on the components.
Think of this as unraveling the layers of a mystery. Each screw removed is a step closer to revealing the source of the button’s ailment.
Assess and Clean
With the button exposed, assess its condition. If there’s visible debris or grime, employ the power of the compressed air can and rubbing alcohol to give it a thorough cleaning.
Envision this cleaning as a spa day for the weary button. It’s a chance for it to shake off the burdens of past battles and stand ready for new challenges.
Reassembly with Care
Assemble the controller with the same precision used in disassembly. Ensure each component finds its rightful place, and tighten the screws securely.
Picture this as the hero donning a suit of armor before heading back into the gaming arena. The reassembled controller is now fortified for the next adventure.
Test and Validate
Power up your console and give the once-faulty button a test run. Confirm that it’s responding as expected and delivering the performance you deserve.
This is the moment of triumph—the culmination of your efforts. It’s akin to the hero’s successful completion of a challenging quest, celebrated by a newfound harmony in the gaming realm.
As you address faulty buttons, remember that this isn’t just a repair task; it’s an act of compassion toward your gaming companion. By nursing it back to health, you’re ensuring many more epic gaming adventures together.
Conclusion
In the realm of gaming, where every button press is a command and every move is a strategic maneuver, the condition of your controller is paramount. As we conclude this guide on how to fix a rubber pad in a gaming controller, reflect on the journey you’ve taken to breathe new life into your trusted gaming companion.