
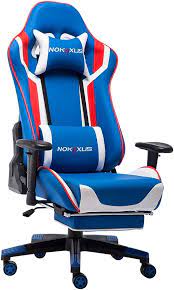
Welcome, gaming enthusiasts and Homall chair aficionados! There’s nothing more frustrating than settling in for an immersive gaming session, only to find that your trusty Homall gaming chair’s angle adjuster isn’t quite living up to its expectations. Fear not – in this comprehensive guide, we’re diving deep into the intricacies of “how to fix a homall gaming chair angle adjuster. Whether you’re dealing with a stiff recline, a wobbly tilt, or any other adjustment-related hiccup, we’ve got you covered. Join us as we unravel the mysteries of your Homall chair’s angle adjuster and equip you with the knowledge and step-by-step instructions needed to restore it to peak functionality. Say goodbye to discomfort and hello to an enhanced gaming experience! Let’s embark on this journey to reclaim the perfect angle for your gaming throne.
How to fix a homall gaming chair angle adjuster
Sit in the chair and take note of any resistance, wobbling, or unusual sounds. This step is like the chair’s check-up – listen to its complaints.
Imagine the chair as a friend having a bad day:
Basic Maintenance and Cleaning: TLC for Your Chair
Every relationship needs a bit of tender loving care, and your gaming chair is no exception. Start by removing any accumulated dust or debris around the angle adjuster.
Picture yourself giving your chair a mini-spa session, wiping away the stress of everyday gaming life.
Lubrication: Oil the Squeaks Away
Sometimes, the squeakiness comes from within. Apply a suitable lubricant to the moving parts of the angle adjuster. It’s like giving your chair its favorite snack – a treat that will make those adjustments smoother than ever. These are among the steps on how to fix a homall gaming chair angle adjuster.Consider this as giving your chair the equivalent of a healthy snack – something to keep it agile and happy.
Best Budget Gaming Monitor for Xbox Series S
Repair or Replace Faulty Components: Surgical Precision
If the issue persists, it’s time for a deeper investigation. Carefully inspect each component of the angle adjuster. Tighten loose screws or bolts, and if a part is beyond repair, consider a replacement. Envision yourself as the chair’s personal doctor, diagnosing and fixing the problem with precision.
Testing the Adjuster: The Moment of Truth
Once you’ve worked your magic, it’s time to put the chair to the test. Adjust it in various positions to ensure it’s responding smoothly. This is like the chair’s final exam – let’s make sure it’s ready for the gaming challenges ahead.
Think of this step as the chair’s triumphant return to the gaming arena after a period of rest and recovery.
Remember, each step is a gesture of care for your trusty gaming companion. With a little patience and these simple steps, you’ll have your Homall gaming chair’s angle adjuster back in top form, ready to support you through countless gaming adventures.
See price for TBQATNTS https://amzn.to/3SdONxe
Tools and Materials: Equipping Yourself for Success
When embarking on how to fix a homall gaming chair angle adjuster, having the right tools and materials is akin to preparing for a journey. Here’s your practical guide:
Tools Needed for the Job: Your Repair Arsenal
Gather the following tools, your trusty companions on this fix-it adventure:
- Phillips Screwdriver: The workhorse of many repairs, perfect for tightening screws.
- Adjustable Wrench: Ideal for handling nuts and bolts of varying sizes.
- Needle-Nose Pliers: Precise grabbing for those hard-to-reach places.
- Allen Wrench Set: Essential for Homall chairs, as they often use Allen screws.
- Storytelling Tip: Imagine these tools as your team of superheroes, each with its unique power to conquer the challenges your chair may throw at you.
Optional Materials: Enhancements for a Lasting Fix
Consider these optional materials to elevate your repair game:
- Lubricating Oil or Spray: The secret elixir for squeaky joints, ensuring smooth movements.
- Replacement Parts: If any components are beyond repair, having replacements on hand saves time.
- Cleaning Cloth: A gentle touch to wipe away the dust and grime, giving your chair a fresh start.
- Storytelling Tip: Visualize these materials as the provisions for your journey – the magic potions and backup supplies for a successful quest.
- Armed with your toolkit and optional enhancements, you’re now ready to venture into the world of Homall chair restoration.
- Like a seasoned explorer, approach each step with a sense of curiosity and determination, knowing that the right tools will be your allies in the pursuit of a comfortable gaming experience.
See price for MoNiBloom gaming chair https://amzn.to/3SfxJa3
Repairing or Replacing Faulty Components: Your Chair’s Road to Recovery
Now that you’ve diagnosed the issues and gathered your tools, it’s time to dive into the heart of the matter – fixing those pesky components on your Homall gaming chair’s angle adjuster. Here’s your roadmap:
Step 1: Surgical Inspection
Grab your Phillips screwdriver and Allen wrench set. Carefully inspect each component of the angle adjuster. Look for loose screws, worn-out parts, or anything that seems out of place. This is your diagnostic phase – the moment you become the chair’s personal doctor.
Best budget gaming monitor for ps4 this year!
Picture yourself in a white coat, conducting a thorough examination, uncovering the hidden ailments of your loyal gaming companion.
Step 2: Tightening the Loose Ends
If you spot any loose screws or bolts, tighten them up using your Phillips screwdriver or adjustable wrench. Think of this step as giving your chair a reassuring hug – providing the stability it needs to stand tall.
Envision yourself as the chair’s supportive friend, lending a hand to keep it together.
Step 3: Precision Repair
For components that show signs of wear or damage, it’s time for a more hands-on approach. Utilize your needle-nose pliers to address intricate issues. This step is like performing delicate surgery – a precise touch to restore the chair’s well-being.
Imagine yourself as a skilled craftsman, delicately repairing the intricate mechanisms that make your chair whole.
Step 4: Assessing Beyond Repair
If, despite your best efforts, a component seems beyond salvation, don’t fret. Refer to your replacement parts and gently remove the old, worn-out piece. Installing the new part is like giving your chair a fresh lease on life – a rejuvenation for continued gaming comfort.
Think of this step as a transformative moment – your chair evolving with a new, resilient heart.
Step 5: Tightening the Final Screws
With repairs and replacements complete, go over all the screws and bolts once more, ensuring everything is snug and secure. It’s like giving your chair a final check-up before it returns to its gaming duties.
Envision this as the chair getting its last health check, ready to stand by your side in the gaming battlefield.
Approach each step with a sense of care and commitment, and soon, your Homall gaming chair’s angle adjuster will be on the path to recovery, ensuring countless comfortable gaming sessions in the future.
Basic Maintenance and Cleaning: A Spa Day for Your Gaming Throne
Your Homall gaming chair has been through countless battles with you, and now it’s time to pamper it with a little maintenance and cleaning. Let’s give your chair a well-deserved spa day:
Step 1: Assess the Battlefield
Before diving into the cleaning process, take a moment to evaluate the situation. Notice any dust, crumbs, or mysterious particles around the angle adjuster? This is the prelude to your chair’s spa treatment – identifying the areas that need attention.
Imagine your chair as a tired hero returning from a quest, covered in the remnants of battles fought in the gaming realm.
Step 2: Gather Your Cleaning Allies
Equip yourself with a cleaning cloth – your trusty sidekick in this quest for cleanliness. This soft, gentle companion will help you wipe away the grime and restore your chair’s luster. Think of it as preparing your spa essentials.
Envision yourself as a caretaker, ready to provide your chair with the tender care it deserves.
Step 3: Wipe Away the Grime
Begin the cleaning ritual by delicately wiping the surface of the angle adjuster and its surroundings. It’s like a gentle massage for your chair – removing the stress accumulated from hours of intense gaming.
Picture your chair sighing in relief as you wipe away the residue, the equivalent of a soothing massage.
See price for Simple Deluxe gaming chair https://amzn.to/48HUVDu
Step 4: Get into the Nooks and Crannies
Use the edge of the cleaning cloth or a small brush to reach the tight spaces around the adjuster. This is the equivalent of giving your chair a detailed facial – paying attention to every nook and cranny for a rejuvenated appearance.
Imagine your chair thanking you as you delicately cleanse its hidden corners, grateful for the attention.
Step 5: Lubricate for Smooth Movements
As a final touch, consider applying a small amount of lubricating oil or spray to the moving parts of the angle adjuster. This is like your chair’s moisturizer – ensuring it remains supple and ready for action.
Visualize your chair feeling revitalized, its joints thanking you for the added flexibility and comfort.
Conclusion
As we conclude this journey of restoring your Homall gaming chair’s angle adjuster, take a moment to appreciate the transformation you’ve facilitated. Your chair, once plagued by discomfort and quirks, now stands as a testament to your commitment to a seamless gaming experience.